Step-by-Step Guide to Install Microsoft SQL Server 2005/2008/2012 Express as a Host Database Server for Bopup Communication Server
This document describes an installation process of Microsoft SQL Server 2005/2008/2012 Express Edition that can be used as a database server to host a program data of Bopup Communication Server.
Microsoft SQL 2005/2008/2012 Server Express Edition (hereafter SQL Server) can be used as a database server to host a program data of Bopup Communication Server. If the installation of the built-in Microsoft SQL Server 2005/2008 Express that comes with the full server setup package failed due to some reasons then it is possible to install and configure SQL Server manually. This is a required part of the IM system because in order to run Bopup Communication Server on these systems you should install SQL Server first.
Microsoft SQL Server 2005/2008/2012 Express Edition is the free, easy-to-use, lightweight version of SQL Server. Integrated with Microsoft Visual Studio 2005/2008, the SQL Server Express makes it easy to develop data-driven applications that are rich in capability, offer enhanced storage security, and are fast to deploy. Express version is free to redistribute and can be seamlessly upgraded to more sophisticated versions of the SQL Server.
System Requirements
Microsoft SQL Server 2005/2008/2012 Express Edition requires the following system configuration:
- Computer with Intel or compatible Pentium III 600 MHz or faster processor (1 GHz or faster is recommended).
- Minimum of 192 MB of RAM (512 MB or more is recommended).
- 525 MB of available hard disk space
- Supported Operating Systems: Windows 2000 Service Pack 4; Windows Server 2003 Service Pack 1; Windows XP Service Pack 2 and higher versions of Windows
Installing prerequisite software
Please note that you must have administrative rights on the computer to install the SQL Server. Before downloading and installing the SQL Server make sure and verify that the following software is installed on your computer:
- Windows Installer 3.1
- Microsoft .NET Framework 2.0
Download Windows Installer 3.1 using the following download page:
http://www.microsoft.com/downloads/details.aspx?FamilyID=889482fc-5f56-4a38-b838-de776fd4138c and install it using provided instruction there. Reboot your computer if needed after installation.
Windows Installer 3.1 is already included in Windows 2003 SP1 and higher so there are no needs to download and install it on the latest versions of Microsoft Windows.
There are 2 versions of Microsoft .NET Framework 2.0 available, for 32-bit and 64-bit platform. Please use the links below for your system:
Install the framework using instructions provided on the download page.
Installing Microsoft SQL Server 2005/2008/2012 Express Edition
Choose the right version of Microsoft SQL Server Express for you and for your environment and then download it from Microsoft website using the links below.
Microsoft SQL Server 2005 Express SP4
Microsoft SQL Server 2008 Express SP3
Microsoft SQL Server 2012 Express
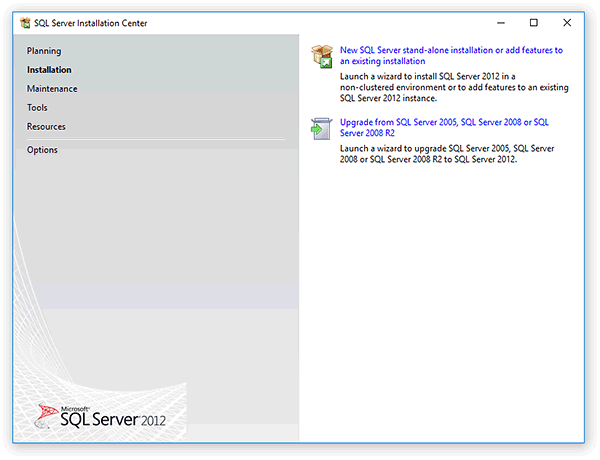
Run the installation package and SQL Server setup will start. Click
Installation on the right and then choose "
New SQL Server stand-alone installation or add features to an existing installation" link on the screen to proceed.
 |
|
| Welcome page of the setup wizard of Microsoft SQL Server 2012 Express Edition |
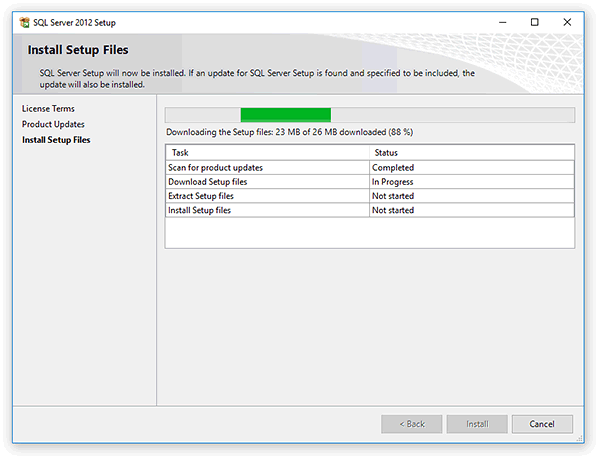
Agree with License terms and click
Next to let the setup wizard check your system configuration and verify installed and required components. The setup will download and install the modules if they are required by the SQL Server setup. Wait while the required packages will be installed.
 |
|
| Installing software components required by Microsoft SQL Server 2012 Express Edition |
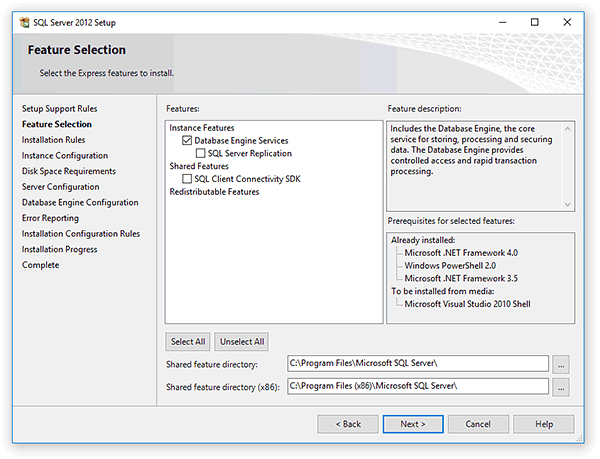
Click
Next to forward the setup to the next page with a selection of features that will be installed. Only "Database Engine Services" are needed so clear all other checkboxes to deselect other features.
 |
|
| Select features of the SQL server to install |
Click
Next button to proceed to the selection of Authentication Mode that will be enabled on the SQL server. The Authenticatiom Mode tells the SQL server how to accepts connections and which credentials to use in order to authorize those connections, and you can select the "
Windows Authentication Mode" or the "
Mixed Mode".
The "
Windows Authentication Mode" tells the SQL server to use current Windows user's credentials under which the connection is made. This is most secure and simple method to handle connections and authorize users on a Windows Domain architecture within Active Directory (LDAP) catalog. Otherwise you can choose the "
Mixed Mode" to allow the server to authorize users using both Windows Authentication scheme and SQL Server Authentication which enables for the SQL server to have it's own user accounts.
 |
|
| Choose the Authentication Mode for Microsoft SQL Server 2012 |
Please note that you should remember which authentication mode you select because you will be asked by the Setup Wizard of Bopup Communication Server (when you will be installing it) on which authentication is used on your database server.
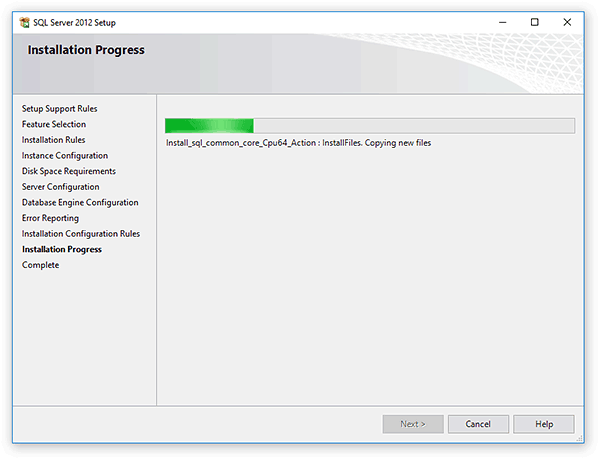
Click
Next to skip next few dialogs of the wizard with its default settings and to go to the
Ready to Install page. Click
Install button to start installation process of the SQL Server.
 |
|
| Selected features and configuration of the SQL server are being installed |
You need to configure a little SQL Server after it's installation will complete. You should enable TCP/IP protocol for it, start the
SQL Server Browser service and add the
SQL service to Windows Firewall exceptions list.
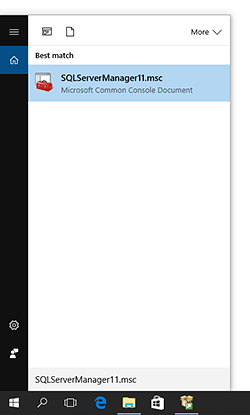
Click "
Start" menu or "
Search Windows" button in Windows 10 and type
SQLServerManager11.msc in the Run edit box. Press return to launch the Configuration Manager.
 |
|
| Launch SQL Server Configuration Manager |
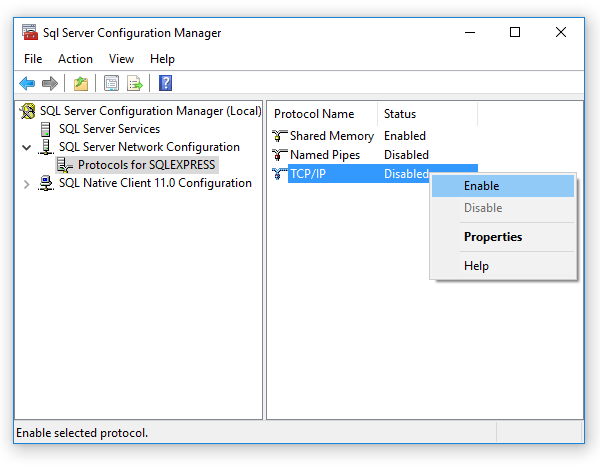
Then expand the "SQL Server Network Configuration" and select "Protocols for SQLEXPRESS" (SQLEXPRESS is the default instance name of the SQL Server) in the left tree of the opened window. Right-click on the TCP/IP protocol in the list and select "
Enable" item from the popup menu.
 |
|
| Enable TCP/IP protocol on the SQL server |
To start the
SQL Server Browser service click the "SQL Server Services" in the left tree and double-click on
SQL Server Browser, the Properties window will show up. Move to Service tab and change Start Mode to Automatic. Therefore, the service will be start automatically when the computer starts. Click OK to apply changes. Back to
SQL Server Configuration Manager, right-click on
SQL Server Browser on the right window and select "
Start" to start the service.
Then restart the
Microsoft SQL Server service from the console or reboot computer to apply changes.
If you have Windows Firewall running on your server computer you should add the
Microsoft SQL Server service to firewall's exceptions list to allow to accept remote connections. Go to Windows Firewall settings by opening "
Control Panel" and clicking on "
Windows Firewall" shortcut there. In the opening dialog box switch to
Exceptions tab and then click the
Add program... button. Navigate to "
\Program Files\Microsoft SQL Server\MSSQL.1\MSSQL\Binn\" folder and select "
sqlservr.exe" file. Click
Open and then
OK to add the SQL service to the exceptions list.
That is all you need to do to configure the SQL Server, now you are ready to install Bopup Communication Server.
Installing Bopup Communication Server
Download one from the available packages from Download Center. Since you have already installed the SQL Server you do not need to download full installation package of Bopup Communication Server which comes with Microsoft SQL Server 2005 Express.
Run the Setup Wizard of Bopup Communication Server and go to the Database Setup Mode screen which is used to select an installation mode of the IM server.
 |
|
| Select to install Bopup Communication Server with a remote SQL server |
Choose the "Use an existing SQL server" option to proceed. Please note that the "Install the Management Console only" option can be used only to administrate an existing instance of Bopup Communication Server. And you cannot choose this option untill you install Bopup Communication Server.
Click Next to go to the
Database Server page of the Setup Wizard.
 |
|
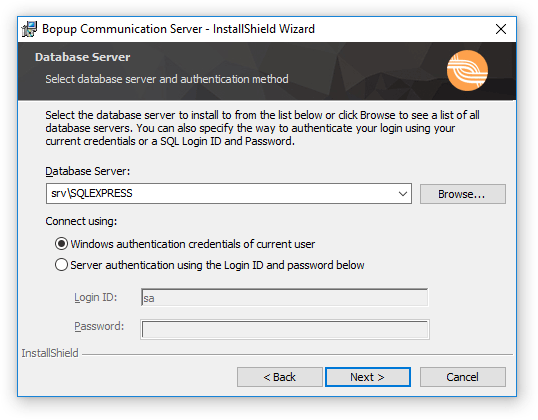
| Specify a SQL server for the IM server |
If you have installed the SQL Server on the same computer on which you are installing Bopup Communication Server then you can type
localhost string or the name of current computer, or it's IP address in the "Database Server" text field. Remember if the SQL Server has been installed with it's default configuration options then you must also type the "
SQLExpress" instance name after the name of a computer in the following format:
Computer_Name\SQLEXPRESS. Otherwise if you have configured the SQL server to use it's default instance instead of named instance then type only the name or IP address of the server.
Specify which Authentication Mode you have enabled on the SQL server, Windows Authentication Mode or Mixed Mode. Type the password for the 'sa' (superadmin) account on the SQL server that should be the same which you can typed in the Setup Wizard. Click Next to start installation of Bopup Communication Server.
Additional information on server and client software comes with the product and can be found in product's
Online Documentation.